Monday, April 2, 2012

Week Twelve - Green Tea

Time to play catch-up...

Boy, has life been crazy these past few weeks! Last weekend was my lovely sister-in-law's baby shower (First niece or nephew! Yay!!) so the week prior to that was filled with lots of fun planning and preparations. Then this past week, I worked like a crazy person. Yes, a crazy person. The kind of crazy person who doesn't make ice cream. But I've risen from the madness with last last week's flavor and will post this past week's flavor within a day or two. Now let's get down to it!

As I mentioned, last weekend was all about little Baby H and his or her beautiful Mommy-to-be. Myself and the rest of the killer party planning brigade had spent a couple months trying to create a shower that my sister-in-law would love; one that would suit her perfectly. We ended up going with a tea party theme, complete with doilies, tea sandwiches, and fabulous mismatched china. Ladies were asked to wear a "tea hat" to the luncheon and prizes were awarded for the prettiest hat, the most creative, etc. All in all, everyone seemed to have a great time - success!

A cup of tea to keep me company

And so, when choosing my flavor for last last week, I wanted to go with something tea-like. I thought about a black tea ice cream (mostly because I had a delicious one at Per Se a few weeks ago) but I figured that was too similar to the Chai flavor from Week Three. Green tea was the next logical option and I know a certain coworker of mine has been hinting at me making this flavor for weeks. (There's a container with your name on it in my freezer!) So put on your fancy hats and join me...


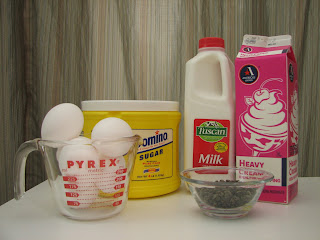
Green Tea Ice Cream

Ingredients:

2 cups whole milk
1 1/2 cup heavy cream
1/3 cup loose green tea leaves
1 cup sugar
6 egg yolks


1. Pour the milk into a saucepan and heat over medium high until bubbles start to form around the edge. Add the tea leaves and steep for thirty minutes.

2. Once tea is fully steeped, pour through a fine mesh sieve, pushing the tea down to release as much liquid as possible. Return the milk to the saucepan.

3. Add the heavy cream to the saucepan and heat over medium high until bubbles start to form around the edge.

4. Combine the egg yolks and sugar in a bowl and whisk to combine.


5. Add a small amount of the hot milk into the egg mixture, whisking constantly. Once combined, slowly pour egg mixture into the milk mixture, whisking constantly to avoid curdling. Cook over low heat, stirring constantly, until the mixture coats the back of a wooden spoon.

6. Pour through a fine sieve into a clean bowl and cover with plastic wrap, pressing it down directly on top of the mixture. Refrigerate until completely cooled.

7. Transfer cooled mixture into bowl of ice cream maker and churn. Transfer to a freezer safe container and freeze.

Monday, March 19, 2012

Week Eleven - Chocolate Stout

Happy Belated St. Patrick's Day! What did everyone do to celebrate the patron saint of Ireland? I had some coworkers over to play some cards (not really an Irish activity), eat some Cheddar and Guinness Fondue (not really an Irish food), and drink some Smithwick's (Win!). It was quite a tasty little get-together. And at the end of the day we all tasted, what I believe to be, a quite delicious Chocolate Stout ice cream! I'm excited about this one, though it's pretty much the exact recipe used for Chocolate and Wine...but it's damn good!

This is how gross I look while I'm making ice cream. Blame it on the beer.

When I was trying to decide which beer to use for the ice cream, Guinness was the obvious choice. A bit too obvious, if you ask me. Plus I have one too many bad memories of Guinness. Well, really just one bad memory...but one is enough. Here is my tale of woe:

When my younger sister was in her senior year of college, she studied abroad for a semester in Dublin. I was super jealous, since I missed the boat on the study-abroad experience (changing your major four times makes it difficult to do cool stuff in college - let that be a lesson to you young ones!) but luckily I had a sweetheart of a boyfriend (now-husband!) who could sense my longing for The Emerald Isle; as an early Christmas present that year, he bought me a ticket to Ireland for a 10-day visit. Naturally, I was super excited about the trip, as was my sister. She began planning things for us to see and do during her final days there (he coincided my trip with the end of hers so we could fly home together for the holidays...sweet AND smart!), including a trip to Belfast. To make a long and heartwrenching story short, I was deviously infected (I knew that hacking old man was not to be trusted!) on the flight over with the flu and was terribly sick for the first five or six days of the trip. I ruined most of her plans, including Belfast, but eventually decided I needed to suck it up and get out there. I mean, how many times in my life will I get a free trip to Ireland?

Our first attempt at tourism was a hop on/hop off bus tour of the city, visiting sites like Trinity College, St. Stephen's Green, Temple Bar, and St. Patrick's Cathedral. I was a bit woozy the day of the tour but packed a bottle of water and some crackers and merrily boarded the double-decker bus. Our final stop on the tour was - you guessed it - the Guinness Storehouse. It was super cool; we took a guided tour, learning all about Arthur Guinness and his tasty brew. The tour concluded at the top of the Storehouse in the Gravity Bar: a glass-enclosed bar providing panoramic views of Dublin. Along with the price of admission, guests receive a pint of Guinness to enjoy while taking in the grey (but lovely) scenery. My sad not-so-short story ends here when I took two sips of my sister's pint and vomited. Not in front of anyone. But come on!

All that was to say that I opted for Murphy's Stout instead of its pretty big sister (here's looking at you, Coll) Guinness. And as far as I could tell Saturday night, nobody got sick from my ice cream. Sláinte to that!


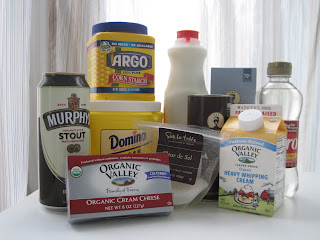
Chocolate Stout Ice Cream

Ingredients:

1/3 cup cocoa powder
1 cup sugar
3/4 cup Murphy's Stout (or Guinness, if you must)
1 1/2 ounce bittersweet chocolate
1 1/4 ounce cream cheese, softened
1 tbs plus 1 tsp corn starch
2 cups whole milk
1 1/4 cups heavy cream
2 tbs light corn syrup
1/8 tsp sea salt

1. In a saucepan, combine the cocoa powder, 1/3 cup sugar and the beer. Cook over medium heat until the sugar dissolves, about three minutes.

2. Chop the chocolate and put in a heat-proof bowl. Pour the wine mixture over the chocolate and stir until smooth.

3. Add the cream cheese to the chocolate mixture and whisk until smooth.

4. In a small bowl, combine the cornstarch and a little milk. Set aside.

5. In a large saucepan, combine the remaining milk, the cream, and the corn syrup and cook over medium heat until mixture reaches a boil, allowing it to boil for a minute or so, stirring all the while. Remove from heat.

6. Add cornstarch mixture to the milk mixture, whisking constantly. Return to heat, stirring with a spoon or spatula, and cook until mixture thickens, about three or four minutes. Remove from heat.

7. Whisk the chocolate mixture into the milk mixture until completely smooth. Pour through a fine sieve into a clean bowl and cover with plastic wrap, pressing it down directly on top of the mixture. Refrigerate until completely cooled.

8. Transfer cooled mixture into bowl of ice cream maker and churn. Upon completion, transfer to a freezer safe container and freeze.

9. Eat it!


Wednesday, March 14, 2012

Week Ten - Hibiscus and Meyer Lemon Sorbet

Okay, I know. I'm the worst! I didn't get around to making last week's flavor until today but I promise I have a slightly decent excuse! Along with work on the weekdays and a pseudo-job interview, I spent Friday and Saturday eating at super amazing restaurants: Friday, with my husband at Dirty Candy, and Saturday, with my best friend at Per Se. Needless to say, I spent most of my weekend in a very tasty food coma, completely neglecting this little blog of mine.

But enough with the excuses! Let's get on with the deliciousness. Waiting until today to make this flavor actually worked out quite well, what with this lovely weather we're enjoying. When the warmer weather sets in (even if only for a week...) I find few things as refreshing as a cold glass of iced tea. The idea of sitting outside with a good book (today, it was The Hunger Games) and a glass of iced tea (today, it was hibiscus tea...because I happened to have an abundance) and enjoying life just makes me smile. So I took that idea, added some refreshing zing with the Meyer lemon, and created, what I believe to be, quite the delightful dessert. Upon finishing the batch, I actually immediately made a second batch so I could take some to a friend's house this weekend. Hopefully, they share in my delight!

And hopefully, you do, too! Here you have it:


Hibiscus and Meyer Lemon Sorbet

Ingredients:

2 cups water
1 cup dried hibiscus flowers
1/2 cup sugar
1/4 cup Meyer lemon juice


1. Add the water and hibiscus flowers to a pot and bring to a boil. Cover the pot and let the tea steep for fifteen minutes.

2. Strain the flowers out of the tea and return it to the stove. Add the sugar and heat, stirring until the sugar has dissolved.

3. Pour the mixture into a clean bowl and cover with plastic wrap, pressing it down directly on top of the mixture. Refrigerate until cool

4. Once completely cooled, add the lemon juice and stir to combine.

5. Pour cooled mixture into bowl of ice cream maker and churn. Transfer to a freezer safe container and freeze.

6. Enjoy on a warm evening on a porch swing with someone you love! (Or on a cold afternoon, huddled on the couch while watching Judge Mathis. Which is how I plan to eat the leftovers when this weather leaves us next week.)

Sunday, March 4, 2012

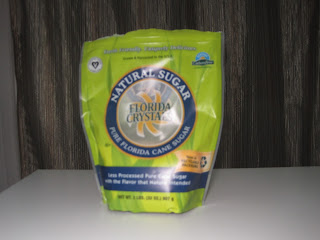
Week Nine - Dairy Free Salted Caramel

Greetings, friends! Sorry for being a day late, yet again. I spent the day yesterday with my in-laws, checking out the van Gogh exhibit at the Philadelphia Museum of Art. I highly recommend it for anyone able to check it out! But I'm home now and ready to regale you with this week's ice cream adventures. Here we go!

When I decided to create this blog earlier this year, the very first request I received was for a dairy free flavor. I have since had a couple other people ask for one so I figured I'd give it a shot. Originally, I was going to attempt some sort of chocolate and coconut concoction but at the last minute I decided to try to make it vegan, instead of just dairy free. I have some vegan sugar in the house so I thought a salted caramel would be perfect. (I should warn you at this point that I was taking photos at night with a crappy camera so my pictures are not very good this week. Sorry!)

The first step was to make the caramel, so I started with the white sugar:


This sugar immediately turned a strange color, almost as if I had added cream to the sugar. Except I hadn't. I drizzled a little onto a paper towel to taste it and it immediately hardened. Boo. So I poured it into a paper bowl (where it completely hardened, forming a pretty cool weapon, within minutes) and started from scratch with the dark brown sugar:


This time around, the sugar sat on the heat for about five minutes refusing to melt so I added a little water to help things along. The caramel quickly began to form, bringing with it a terribly gross odor. Garbage. And on to sugar number 3! Unfortunately, those are the only two vegan sugars I have in my house so the recipe at this point became dairy free instead of vegan. Boo. But for those who still wish to read on, I present to you this week's flavor...


Dairy Free Salted Caramel

Ingredients:

1 cup soy milk
2 cups soy creamer
1.5 cups sugar
1/2 tsp sea salt
2 tbs corn starch (Is corn starch vegan? I wasn't sure about that so I may have failed with the vegan one after all.)


1. Pour the sugar into a large sauté or sauce pan, spreading evenly, and cook over medium heat. Do not stir until the sugar at the edge of the pan starts to melt.

2. At this point, begin to push the sugar toward the center with a heat-proof spatula. It's okay if lumps form, they'll melt later.

3. Once the sugar is completely melted, allow to cook for another minute or two until it turns a deep (but not too dark) copper color. Remove from heat and stir in sea salt.

4. Slowly add the soy milk, whisking vigorously as you pour to keep caramel from seizing. Once the milk is added, return to medium heat and add the soy milk. Continue to cook, stirring all the while, for a few more minutes.

5. Pour through a fine sieve into a clean bowl and cover with plastic wrap, pressing it down directly on top of the mixture. Refrigerate until completely cooled.

6. Transfer cooled mixture into bowl of ice cream maker and churn. Transfer to a freezer safe container and freeze.

7. Enjoy!

Saturday, February 25, 2012

Week Eight - Bourbon Pecan Pie

This week's post is inspired by one of my very favorite people in the world: my baby brother. Please join me, friends, in wishing the "baby" of the family a happy 26th birthday! Since his birthday fell during this week (Monday, to be exact) I decided I'd choose a flavor that I thought he'd enjoy. And that bottle of Maker's Mark was just speaking to me...

My husband and I went to visit my younger brother this past December, along with my sister. We had a super fun trip, filled with lots of good food, good drinks, and good laughs. One night, while out to dinner, my brother posed a challenge to the rest of us: he asked us to rate our favorite types of desserts; ice cream, cookies, dessert bars (brownies and the like), cakes, and pies. (I think that was it, right brother? Am I missing one?) What a fun challenge, right?! I immediately began a mental taste test of every dessert I could imagine, pitting one favorite up against another in my mind. Was apple pie better than red velvet cake? Would I rather snack on chocolate chip cookies or salted caramel ice cream? My word, this was going to be difficult!

Eventually, we all weighed in. I believe I ranked cookies at the top, followed closely by ice cream. Pies were probably my third choice. And come to think of it, I don't think pies were my brother's first choice, either. But I know he likes pie! And I am certain that he loves bourbon! I am confident that if he were here in my apartment right now, he'd gladly eat the ice cream in my freezer. And so, with him in mind, I give you this week's flavor...


Bourbon Pecan Pie (adapted from Jeni's Splendid Ice Creams at Home)

Ingredients:

2 cups whole milk
1 tbs plus 1 tsp cornstarch
1 1/2 ounces cream cheese, softened
1/4 tsp sea salt
1 1/4 cups heavy cream
1/2 cup sugar
2 tbs light corn starch
1/4 cup bourbon
3/4 cup glazed pecans (Melt 2 tbs butter, 2 tbs maple syrup and 2 tbs brown sugar and coat 2 cups pecans. Bake the pecans at 350 for 6 minutes. Enjoy the leftovers, they're delicious!)


1. In a small bowl, combine 2 tbs of milk with the cornstarch and stir until combined. Set aside.

2. In a medium saucepan, combine the rest of the milk, cream, sugar,  and corn syrup. Bring to a boil and allow to boil for a few minutes.

3. Remove the pan from heat and whisk in the cornstarch mixture. Return to heat and boil for another minute or so, stirring all the while.

4. In a large bowl, whisk the peanut butter, cream cheese, and salt until smooth. Slowly pour the hot milk mixture in, whisking to combine.

5. Mix in the bourbon, and take a sip or two yourself to be absolutely sure it's the right stuff. Pour through a fine sieve into a clean bowl and cover with plastic wrap, pressing it down directly on top of the mixture. Refrigerate until completely cooled.

6. Transfer cooled mixture into bowl of ice cream maker and churn. Upon completion, mix in the glazed pecans then transfer to a freezer safe container and freeze.

7. Enjoy!


But wait, there's more! I want to pose my brother's dessert challenge to all of you! Post in the comments with your rankings, from least favorite to most favorite. I'm interested to see what your favorites are...and what I should avoid bringing to your house for a dinner party. Have fun!

Saturday, February 18, 2012

Week Seven - Valentine's Day Takeout

Happy belated Valentine's Day, friends! I hope you all enjoyed your day on Tuesday, whether you spent it with your significant other, your closest friends, or your favorite bottle of tequila. I spent the day seeing a movie by myself (one of the best ways to spend an afternoon, in my opinion), then shopping with my best friend, then eating tacos and watching crappy television with my husband. It was bliss.

I've never been super big on Valentine's Day. It seems really silly to me: one day a year to get all romantic and lovey dovey. Bah Humbug. I'd rather be romantic and lovey dovey all the other days of the year and then save my money on February 14th. The price of roses jumps up to crazy talk. And any restaurant I would like to eat at (read: not Applebee's) is likely hosting some sort of expensive prix fixe wine-and-dine deal which will likely contain one, if any, vegetarian options. So again, Bah Humbug.

Early on in my relationship with my husband, however, I must have been a lot less cynical about February 14th. For our first Valentine's Day, we celebrated for an entire weekend. On Friday night, I cooked us a fancy college meal of penne vodka and some sort of weird chocolate custard-like things that I made in a blender. We exchanged gifts: I remember being really excited about giving him the new Final Fantasy game along with the DVD's of a show called Upright Citizens Brigade, a sketch comedy show that he was really into. To kick the gift up a notch (something I take pride in) I got tickets for us to go to the Upright Citizens Brigade Theater, an improv theater in Manhattan started by the original members of UCB. (It should be noted that this turned out to be an even-more-awesome gift than I had anticipated when, among the many stars taking part, Mike Myers joined the troupe for the evening. My husband is a HUGE Wayne's World fan so I scored big points that night!) After exchanging gifts, we went to this adorable little Thai restaurant a couple towns from my school. It was candlelit and romantic and, as I recall, pretty friggin' delicious. Ya can't ask for more than that out of a Valentine's Day dinner!

Fast forward to today, as I scorn the foolish holiday but gladly stock up on the 40% off conversation hearts at Target. Though we may not celebrate like we did that first year, I do look back on that weekend and smile. And so, with that feeling in mind, I chose this week's flavor: Valentine's Day Takeout. (The name needs some work, I'll admit.) I went back to my favorite ice cream book for this one as the recipe so perfectly, and yet so oddly, represents the holiday in my mind. The flavor is basically a combination of coconut and peanut, a base for many Thai curries. There is a small amount of heat in this and not a ton of sweetness...it is subtle and tasty. A success, in my book!

Here you have it, folks...


Valentine's Day Takeout Ice Cream (adapted from Jeni's Splendid Ice Creams at Home)

Ingredients:

1 1/4 cup whole milk
1 tbs plus 2 tsp cornstarch
1 1/4 ounce cream cheese, softened
1/4 cup natural peanut butter
1/2 tsp sea salt
1 1/4 cup heavy cream
3/4 cup unsweetened coconut milk
2/3 cup sugar
2 tbs light corn syrup
2 tbs honey
1/2 cup unsweetened shredded coconut, toasted
1/8 tsp cayenne pepper


1. In a small bowl, combine 2 tbs of milk with the cornstarch and stir until combined. Set aside.

2. In a medium saucepan, combine the rest of the milk, cream, coconut milk, sugar, corn syrup, and honey. Bring to a boil and allow to boil for a few minutes.

3. Remove the pan from heat and whisk in the cornstarch mixture. Return to heat and boil for another minute or so, stirring all the while.

4. In a large bowl, whisk the peanut butter, cream cheese, and salt until smooth. Slowly pour the hot milk mixture in, whisking to combine.

5. Add the toasted coconut and cayenne pepper. Pour through a fine sieve into a clean bowl and cover with plastic wrap, pressing it down directly on top of the mixture. Refrigerate until completely cooled.

6. Transfer cooled mixture into bowl of ice cream maker and churn. Upon completion, transfer to a freezer safe container and freeze.

7. Add some chopped peanuts and enjoy!

Sunday, February 12, 2012

Week Six - Chocolate and Wine

Sorry, folks...I'm a day late! Yesterday saw me quite busy: lunch date with an old friend; dinner/movie date with my lovely husband; and the sad news about Queen of the Night, Whitney Houston. By the end of the night, I was too tired to form proper sentences so here we are today...with chocolate and wine.

Are there any two things in life that go together better than chocolate and wine? Chocolate and caramel, maybe. Wine and cheese. Cheese and crackers. Okay, so the answer is, probably, yes. But for my money, when I want to be spoiled, it's going to be a bottle of delicious red wine and some quality dark chocolate. Mmm...

As Valentine's Day approached, I thought this combination was perfectly appropriate. (And I already have a special flavor planned for the actual holiday.) Thinking back to Week Two's flavor, and how deliciously chocolate-y it was, I decided to go back to that recipe and tweek it a bit for this week's creation. I was also quite excited to showcase the box of wine we bought from Trader Joe's in this batch. You read it correctly, I used boxed wine this week! Don't fret, it's not Franzia. (I know my college friends were having ugly flashbacks...) My husband recently decided he wanted to buy a somewhat-classier (Classy boxed wine?) box of wine so that if he wanted to have a glass a few nights it week, it wouldn't oxidize and go bad after a few days if he didn't drink it all. (I feel like I need to point out that we are currently dieting so drinking more than a glass a night is temporarily forbidden. Under normal circumstances, that one bottle would be gone in one night. And it would probably have another empty bottle next to it to keep it company.) On a trip to Trader Joe's, we found a $10 box of Australian Shiraz and decided to take the plunge. While it's certainly not the best wine I've ever had, it is certainly drinkable. Score for us! Boxed wine on the kitchen counter...nice.

This ice cream turned out to be just as chocolate-y delicious as the Chocolate with Cinnamon and Cayenne, but the wine flavor is extremely faint. I think it is a combination of things: first, perhaps I should have used something more robust than a Shiraz; and second, next time I will add more than a half cup of wine to the recipe. That being said, we ate a great deal of this last night. I hope enough remains that I'm able to share it with others because it is pretty tasty, if I do say so myself. (And I do.) But for now, I shall present you with some photographs...


Chocolate and Wine Ice Cream

Ingredients:

1/3 cup cocoa powder
1 cup sugar
1/2 cup red wine
1 1/2 ounce bittersweet chocolate
1 1/4 ounce cream cheese, softened
1 tbs plus 1 tsp corn starch
2 cups whole milk
1 1/4 cups heavy cream
2 tbs light corn syrup
1/8 tsp sea salt


1. In a saucepan, combine the cocoa powder, 1/3 cup sugar and the wine. Cook over medium heat until the sugar dissolves, about three minutes.

2. Chop the chocolate and put in a heat-proof bowl. Pour the wine mixture over the chocolate and stir until smooth.

3. Add the cream cheese to the chocolate mixture and whisk until smooth.

4. In a small bowl, combine the cornstarch and a little milk. Set aside.

5. In a large saucepan, combine the remaining milk, the cream, and the corn syrup and cook over medium heat until mixture reaches a boil, allowing it to boil for a minute or so, stirring all the while. Remove from heat.

6. Add cornstarch mixture to the milk mixture, whisking constantly. Return to heat, stirring with a spoon or spatula, and cook until mixture thickens, about three or four minutes. Remove from heat.

7. Whisk the chocolate mixture into the milk mixture until completely smooth. Pour through a fine sieve into a clean bowl and cover with plastic wrap, pressing it down directly on top of the mixture. Refrigerate until completely cooled.

8. Transfer cooled mixture into bowl of ice cream maker and churn. Upon completion, transfer to a freezer safe container and freeze.